My shining star

My shining star

Wednesday, 29 February 2012

Daisy Wreath using transfer technique


Hi there - this is the final item made at Sheena's workshop at the weekend - it used the transfers to create a relatively quick and effective topper for a card.
To do the transfer I first used a round mountboard shape and marked on my wreath transfer where it would lie. Then I painted the mountboard shape using emulsion paint - thickly. Added the transfer face down into the paint and rubbed hard onto its reverse side to allow it to gel with the paint. Then I used a heat gun to dry it for 3 mins. Once dry I used a small amount of water and a sponge to rub away the paper revealing the image. Then mounted it on card from the Sheena CD Rom.

Lilac candles


Hey there! Good morning from a grey but dry Lancaster. Well I finally got my prize from card maker of the year and it included this lilac stamp from Sheena Douglass. So I set to and painted some candles. I love this stamp its so pretty - and relatively easy to do too. Here's the recipe for my candles.
1. Stamp the lilac and leaves using staz-on.
2. Stipple paint the flower heads in dark blue acrylic paint and highlight with white acrylic paint.  Allow to dry.
3. Overstamp the flower heads again with staz-on and then paint the individual flowers using purple and white acrylic paints. Allow to dry.
4. Paint the leaves using a flat brush double loaded with greengold and antique white and tipped with dark blue.
5. Paint on the stalks in dark brown.
Lots of fun - hope you like them x

Sunday, 26 February 2012

Lilac

Hi there - my second post of the day - my family and I have been fed and hubby is sorting out the showering madness that is Sunday evening. So I've settled down to upload my next offering. It was also created at the Sheena Douglass workshop that I went to yesterday - this is what we created in the afternoon workshop and I'm really pleased with it! The recipe is as follows:
1. print out backing paper from CD Rom.
2. Stamp onto backing paper using the swirls to position the lilac flower. Stamp also the leaf.
3. Using a scruffy brush add paint using a stippling action to the flower - this was dark blue acrylic paint from pebeo. Then added white paint using the same scruffy brush and stippling action to highlight the rhs of the flower.
4. Overstamp with the flower stamp then paint the flowers using white and lilac acrylic paint. Add the dots to the centres of the flowers. Make sure to use the white paint to enhance the highlight.
5. Use greengold, antique white and a dot of blue to paint the leaf.
6. Use brown to paint the stem and leaf attachment then highlight with white.
7. Add to card after distressing edges with black soot. Distress sentiment too and add this to the card.
I'd like to enter this for the 'anything goes' challenge over at thatcraftplace.

Using a ribbon

http://panpasteluk.blogspot.com/

Hi there!

Its been a mad few days but now I've got the opportunity to upload this post whilst the oven heats up to cook tea. Yesterday I was at Dawn Bibby's shop in Church at a workshop with Sheena Douglass. One of the items we made was this wall hanging. Neither photo seems to be brilliant but I'm afraid its the best I can do just now!  Since it uses a ribbon I'd like to enter it for the current pan pastel challenge.
My recipe is as follows:
From Sheena's CDRom print out the three heart shaped images in black and white onto watercolour card.
Paint the daisies first with blue acrylic paint then white then paint the grass and stems. Leave everything elase black and white. Cut out three backs for the hearts printed in paper from the CD. Use versa mark and black sparkle wow powder to edge the hearts and use ribbon to link the three hearts together. I've a couple more items to add made at the workshop but will have to add them later! Time for tea!!! x

Friday, 24 February 2012

Hedgie Birthday


Good morning fellow crafters. Its actually sunny here in Lancaster at the moment - yipee!!!! Thought I'd share this card with you though before I head down to the local school to help plant some hedge plants. So I guess its Hedgie before Hedge today!
The card was made using lots of the February blooms kit from Duck Pond crafts. They make some great kits - check them out! Anyway my recipe is a s follows:
1. Colour in image using promarkers.
2. Cut image with spellbinders and die and mount onto satin board from Create and craft.
3. Fold an 8x8 card blank to make an easel base card and decorate the botton part. Used satin board again plus ribbon and blooms from DPC and sentiment from Kanban.
4. Cut top part background using a martha stewart over the page punch. Added more ribbon and blooms from DPC and also the topper and a piece of Kate Knight paper from a free paperstack that came with Card making and Papercraft magazine.
I think that covers it - have a wonderful day xxx

Wednesday, 22 February 2012

Just for You My Friend

Two cards here I've made on this wet afternoon in Lancaster! Both use the Dawn Bibby Flowerpatch kit so I thought I'd put them both together in a single post. The first one uses one of Dawn's aperture cards and I've used a friend sentiment that I've distressed around the edges using china blue distress ink. On the front I've used Dawn's flowers and leaves plus two fairies from the fairyopolis collection at Crafters Companion.
On the second Card I've used Kate Knight papers and punched a border with a Martha Stewart Punch. I've tied ribbon around and then added this to the card. Then I've used a flowerpatch topper and flowers.

Monday, 20 February 2012

Luke's card


My second post of the day - this card is for my 9 year old nephew - I usually do football cards for him but thought I'd take a different track this year since he does love animals too! Let's hope he does have a hoot on his birthday!!! My recipe:
1. Cut the woodland animals range papers to size - stick together and add a piece of brown gingham ribbon.
2. Use spellbinders fleur de lys rectangle die to cut the mat and add the owl decoupage.
3. Add the card stock tree and leaves.
4. Add sentiment and the tim holtz adage tickets.

Christmas Card cat


Hello there on this wet and windy day - its not very nice here in Lancaster and its my daughter Penny's 4th birthday today! Bless her cotton socks - she wanted to go to nursery so mum still has time to play! But not much - so here we have today's first card - its using a cat image from a Joanna Sheen CD rom and a thistle bouquet from the blooms kit from Duck Pond Crafts. Here's my card recipe.
1. Print out image from CD Rom.
2. Cut background card to size - the lilac is humkydory and the blue/green is satin board from create and craft.
3. Wrap with purple/green ribbon from my blooms kit - Duck Pond Crafts. Add bow.
4. Add image mounted onto more satin board.
5. Add sentiment and thistle bouquet.
I'm going to enter this for the animal challenge over at Pan pastel.

Friday, 17 February 2012

Bez's birthday card: Lavinia stamps


Good morning everyone - thought I'd take this opportunity to upload this card I've just made for my mother-in law, Bez's birthday. The kiddies are a little better and they're watching the Incredibles whilst I do this!
The card was made as follows:
1. Background - brayered adirondack lettuce onto the clarity paper.
2. Added sky using the big and juicy 'waterfall'.
3. once dry used Lavinia stamps to create the scene using adirondack 'pitch-black'.
4. Once dry added coloured highlights using a promarker and some ground foliage in bottle green.
5. Sprayed with crafters companion spray and sparkle.
6. Mounted onto silk mirri board.
7. Made up easel card with 8x8 blank
8. Used black 8 x8 card cut down to form the front easel.
9. Added ribbon to front easel then stuck 'topper' on. Added gems and stuck to card.
10. used special mulberry paper on base and added two dawn Bibby sentiments.

Wednesday, 15 February 2012

Daisy Box


Good afternoon to you all - its been quite a day (and night) in the Fisher household - my two little girls have both been poorly and had me up several times in the night! They are now tucked up on the sofa watching Disney Princess so I thought it was about time I did a blog entry for today.
This is another item I've made for the Morecambe sale coming up on 10th March. I'm pleased with this one as the base cost was nothing - the box is an old chocolate box from Christmas and I've fusioned it with Sheena Douglass Daisies. I saw on a website the other day the marriage of daisies and lavendar which looked particularly wonderful so watch out for that one! Anyway the recipe is as follows:
Take an empty chocolate box and paint in emulsion paint - you will need several coats to obscure any writing. Don't forget to do the base.
Apply watered down glue then the fial coat of paint to achieve the crackle surface.
Stamp flower design using staz-on ink then paint with acrylic paints.
After dry add spray and sparkle and emboss the lid edges.
Add bow.
Hope that all makes sense - hopefully next time I speak to you my poorly children will be well again!

Monday, 13 February 2012

Hearts and flowers

Made this card using Katy's sketch from the do-crafts site up to 14th feb. But I love this card so much I have to put it here! The card recipe is as follows:
Paint a mountboard heart with red acrylic paint and leave to dry.
Paint fusion the shape with daisies from Sheena Douglass.
When dry emboss the edges with WOW powder (Brass) and then spray with spray and sparkle from crafters companion.
To a white 8 x 8 inch card add a DCWV rick rack black base.
Cut a square of red silk card aprrox 6 x 6.
Layer these up then add the red ribbon. Cut hearts from gold mirri board and black mirri board and add kanban sentiment.

Friday, 10 February 2012

Pansy Candles

These are definitely my best candles to date - they were bought in AsDA and have been like a dream to work on compared to the last lot of candles I made - so much easier for the pain to go on - and it stayed where you put it - I know where I'll be buying all my candles from in the future!Used the pansy stamps from Sheena Douglass and acrylic paints - mango, red and lilac for the flowers plus naples yellow and black for the pansy 'faces', forest geen and greengold for the leaves and stems. 

Poppy cards

These cards were made in a simliar way to the wine box - I painted the tags using emulsion paint and stamped them with the images once dry. After that I painted the poppies and leaves using acrylic paints then edged the tags with wow embossing powders once the tags were dry. Fianlly I used crafters companion spray and sparkle to shine them up a bit. Once made I've mounted the tags onto a matt on a DL card and added ribbon and a sentiment. I may enter these cards for a tag challenge in the new papercraft inspirations magazine.

Poppy Candles

Next post of the day - its more poppies! This time I added the design to candles! Again used the acyrlic paints to paint the stamped images.

Poppies Wine Box

Good afternoon Bloggers - and welcome to my first item this afternoon - after watching the launch of Sheena Douglass's new range on Create and Craft I feel totally inspired and need to get my blog updated before I can go and make some more stuff.
This wine box is one from Sheena's range - its a brown card box and I've pained it black using emulsion paint then paint fusioned it with the poppy design from Sheena's range and acrylic paints. Once everything was dry I used crafters companion shiny gloss spray as a protective coating. Hope you like this one - its one of my favourites.

Monday, 6 February 2012

Pan Pastel Challenge 4: Happy Birthday


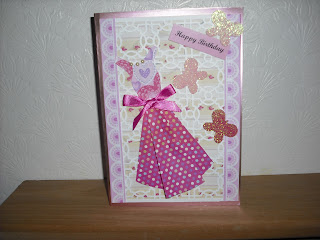
Hello Bloggers - well its turned into a lovely day here in Hornby - the village is getting ready for our Royal visitor tomorrow - here's hoping the weather is kind for those of us who will be waving flags on the pavement! Today's offereing I want to enter for the PanPastel Happy Birthday Challenge and have already entered it for the Quick cards free papers challenge. Also I would like to enter it into the Crafters Companion anything goes challenge. The idea came from a card featured in this months simply cards and papercraft.
I've used the template to make the folded skirt and top from free papers in quick cards. Also I've used free papers in the background and down the sides of the card. Behind the dress I've used a Martha stewart punch to make the lattice background. Finally I've added the Happy Birthday and the butterflys and gems.
http://ccmonthlychallenge.blogspot.com/2012/02/welcome-to-challenge-21anything-goes.html

Friday, 3 February 2012

Daisy Wine box


Painted the box using blue acrylic paint and then stamped the daisy chain design on the top and around the side panels. Painted the daisies using acrylic paints and then sprayed the whole thing using crafters companion spray and shine.

Daisy candles

Daisy candles made for the Morecambe High sale - stamped onto the candles with Staz-on then painted the images using acrylic paints - all from Sheena Douglass.